 Note: Note: | This functionality is available only to those customers who have implemented the Customer Service WorkFlow feature. |
Customer Service WorkFlow entails a process in which Taxport Browser-based interface users who do not have privileges to actually make changes to tax record information are instead able to make change requests to authorized Taxport PowerView Interface (advanced) users. Each change request is known as a "Ticket". Instructions on how to process change requests in the Taxport PowerView interface can be found in the Taxport Powerview On-Screen Help in the topic, "Customer Service Workflow" under the section, "Data Access".
Creating Tax Form or Recipient Change Request Tickets:
Creating Tax Form Change Request Tickets:
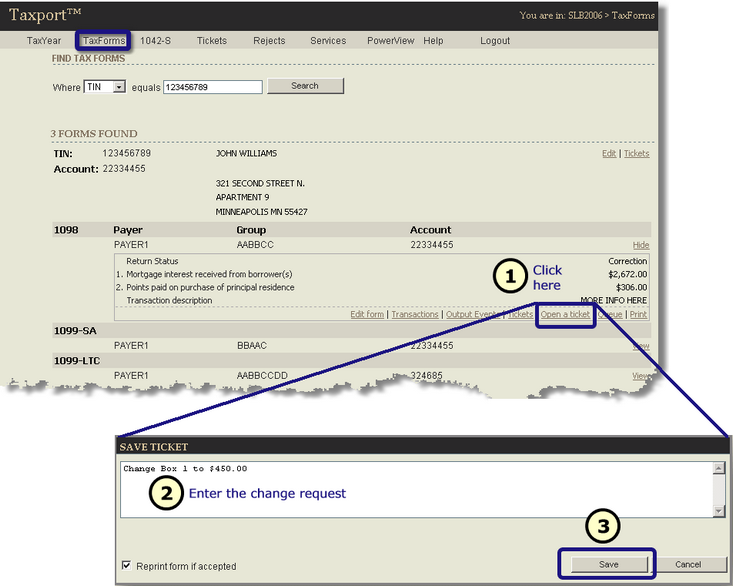
| Step 1: | While displaying a Tax Form, click on the "Open a ticket" link that appears below the Tax Form details as shown below. |
| Step 2: | In the new dialog box that appears, enter the specific change request. Example: "Change box 1 to $450.00" |
 Note: Note: | You can optionally also click on the "Reprint form if accepted" checkbox to flag the record as one that needs to be printed again in the future. See your company's Taxport administrator. |
| Step 3: | Click on the "Save" button. |
 Tip: Tip: | You can display information on all Tickets that are attached to a given tax form by clicking on the "Tickets" link that appears to the left of the "Open a ticket" link you just used. |
Creating Recipient Change Request Tickets:
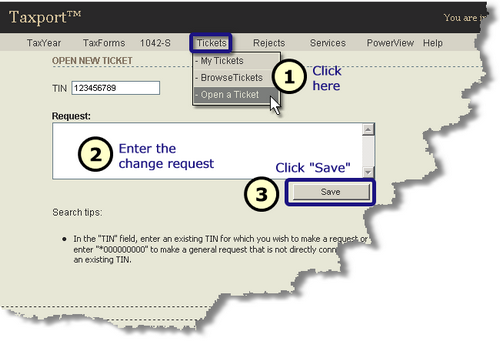
| Step 1: | From the Main Menu, click on the "Tickets" drop down menu and choose, "Open a ticket" as shown below. |
 Note: Note: | For working with 1042-S, use the "1042-S" Main Menu link to the right of the "Taxports" Main Menu link. |
| Step 2: | In the new dialog box that appears, enter the TIN for the Recipient for which you wish to create a change request ticket (Replace the *000000000 with the TIN). |
 Note: Note: | You can also leave or enter "*000000000" in the TIN field in order to enter a general request that is not specifically attached to any one Recipient. |
| Step 3: | Enter the specific change request in the open box below as shown. |
| Step 4: | Click on the "Save" button. |
Viewing Only Your Tickets:
| Step 1: | From the Main Menu, click on the "Tickets" drop down menu and choose, "My Tickets" as shown below. |
 Note: Note: | For working with 1042-S, use the "1042-S" Main Menu link to the right of the "Taxports" Main Menu link. |

| Step 2: | The screen will display only the Tickets that you (the logged in user) have created. See the screen example below. You can click on the "Show" link under the "Details" heading for detailed information on each Ticket. |
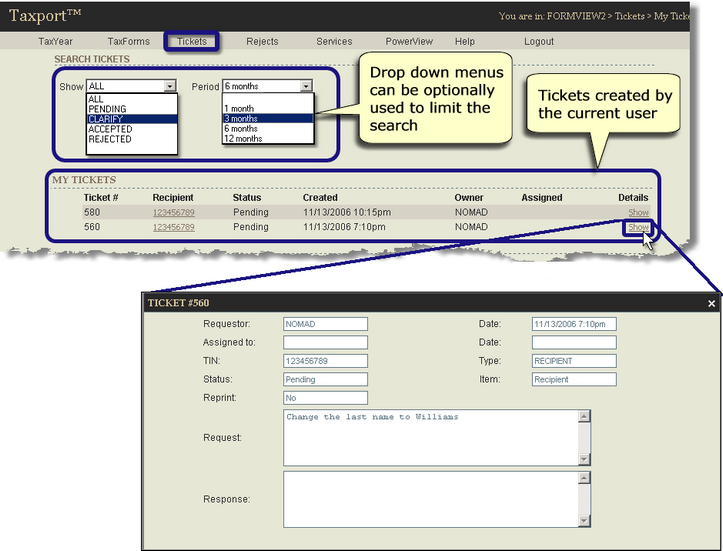
 Tip: Tip: | You can optionally use the drop down menus, "Show" and "Period" to limit the search. |
| • | The "Show" field can be used to limit the search to only Tickets that have the selected status. For a definition of the possible status, see "Status Types" below. |
| • | The “Period” field can be used to limit the search to only Tickets created in the specified number of months prior to the present date. |
Status Types:
| • | "Pending" - the change request is awaiting processing from a Taxport PowerView user. |
| • | "Accepted" - The change request has been accepted by the Taxport PowerView user. |
| • | "Rejected" - The change request has been rejected by the Taxport PowerView user or the Taxport PowerView user attempted to accept the change, but the change did not take place because the change would have violated validation rules. |
| • | "Clarify" - The Taxport PowerView user has requested the Taxport Browser-based user to provide more information to clarify the requested change. |
Viewing Tickets Based on TIN or Ticket Number:
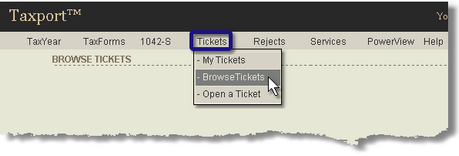
| Step 1: | From the Main Menu Bar, click on the "Tickets" drop down menu and choose, "Browse Tickets" as shown below. |
 Note: Note: | For working with 1042-S, use the "1042-S" Main Menu link to the right of the "Taxports" Main Menu link. |
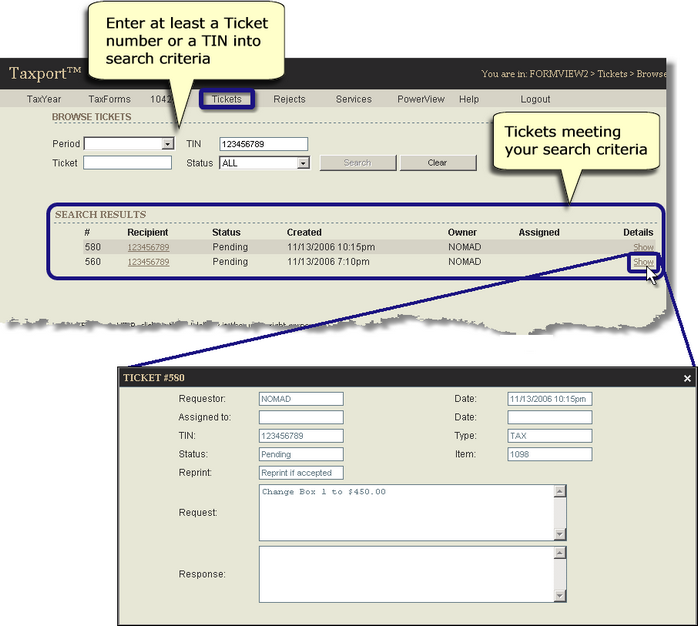
| Step 2: | The screen will display several open fields into which you can enter search criteria. See the screen example below. You must enter at least a Ticket number and/or a TIN to perform a search. For “TIN” searches, use 9 digits and no dashes. Example: “123456789”. |
 Tip: Tip: | You can optionally use the drop down menus, "Status" and "Period" to limit the search. |
| • | The "Status" filed can be used to limit the search to only Tickets that have the selected status. For a definition of the possible status, see "Status Types" above. |
| • | The “Period” field can be used to limit the search to only Tickets created in the specified number of months prior to the present date. |
| Step 3: | Click on the "Search" button to begin your search. The screen will display all Tickets that meet the search criteria you have set above. See the screen example below. You can click on the "Show" link under the "Details" heading for detailed information on each Ticket. |
 Main Menu Main Menu
 Home Menu Home Menu
|


